
P333
YAESU FT950
HF Transceiver – What you Need To Know
INTRODUCTION
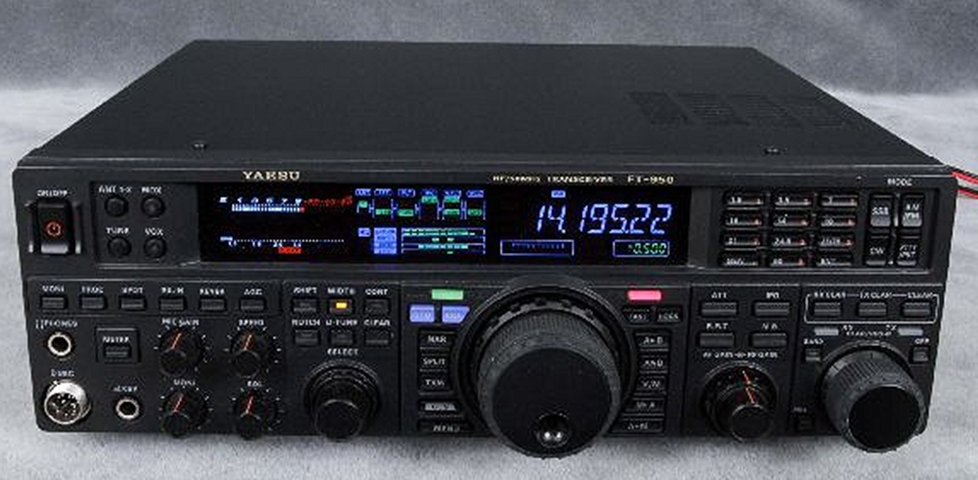
The Yaesu FT-950 is a classic shack rig that covers 160 metres, all HF bands and the VHF 6metre band. This means it has everything needed for quality operations on the first ten bands and modes of the Amateur Radio spectrum. It has great audio filtering features and supports computer interfacing for several digital modes and remote operation. It transmits an adjustable 5 to 100W of SSB and 25 watts of AM/FM.
It is large (365mm wide x 140mm high x 380mm deep) and requires an external (30 amp) 12VDC power supply to make it go.
The first thing that the observer notices is a whole lot of knobs and buttons, which can look intimidating, but the reverse is true because so many dedicated controls makes it possible for the operator to go straight to whatever they need to do, without having to resort to pesky sub-menus.
1. POWERING ON AND OFF
To activate the radio, press the POWER button in the top Left-Hand corner of the front panel for 2 seconds. To turn it OFF, press and hold the same button for 2 seconds.
2. BAND SELECTION
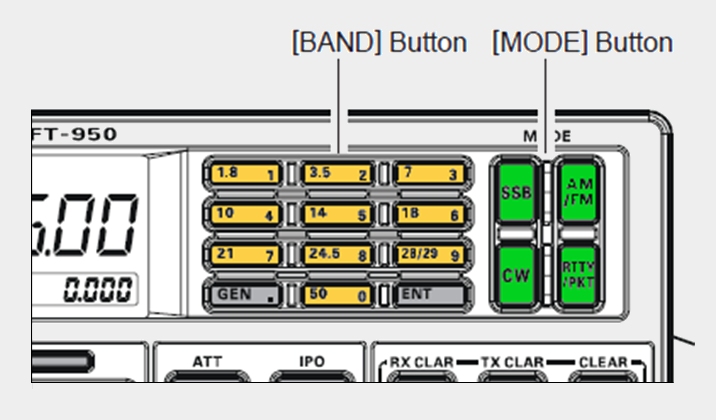
This is very simple. To the right of the display is a keypad that is clearly labelled for the popular amateur bands, as highlighted in yellow in the image below. Press 14 for 14 MHz (20 metres) 50 for 50MHz (6 metres) etc. When changing bands the radio remembers your preferred method of modulation last used on that band. GEN will select the General Coverage Receiver function.
3. MODULATION MODE SELECTION
To the right of this keypad are four mode selection buttons. (Highlighted in Green)
Pressing SSB will make the radio alternate between USB and LSB. Pressing the AM/FM button will alternate between AM and FM etc.
CW and RTTY are selected by the lower two MODE buttons.
4. SELECTING A VFO FREQUENCY
Generally the main VFO knob is active whenever a new band has been selected. Beware that there is a VFO LOCK button just to the upper-right of the main VFO knob. If this one has been recently pressed the word LOCK will appear in small print on the display, just to the left of the VFO frequency. As long as this function is active the main VFO dial will be frozen at the present frequency.
Also be aware that there is interaction between the main tuning VFO-A knob and the Clarifier/VFO B knob to the far right of the transceiver and some funky Mute functions that can confuse first-time operators.
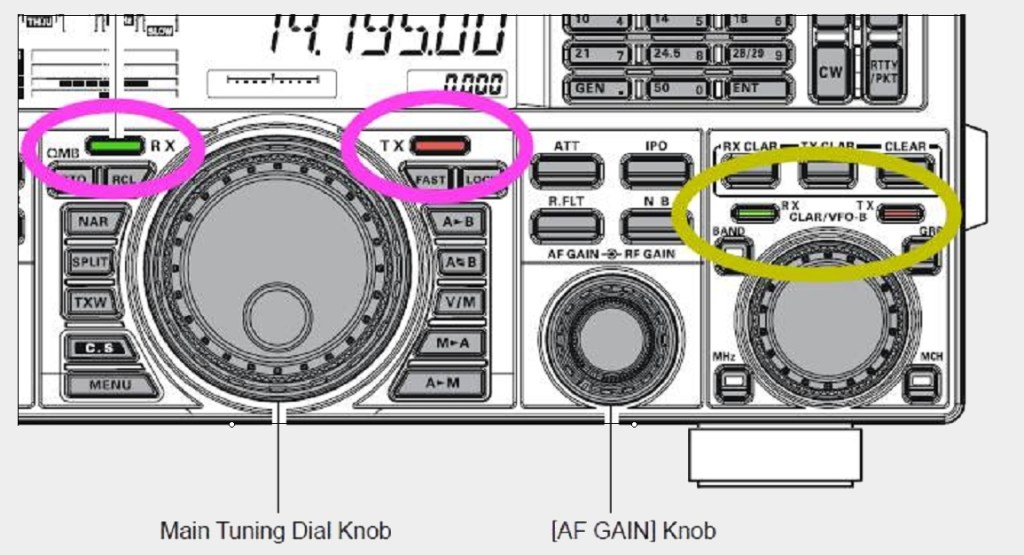
VFO-A In the violet circles above there are red & green indicator lamp/buttons. If they are both illuminated as Red and Green then the large Tuning knob is now controlling VFO-A frequency and the right-hand smaller knob is behaving as a clarifier to fine-tune the present receive frequency.
Note that pressing the green RX indicator once will temporarily mute the receiver audio. Pressing it again will restore the audio.
VFO-B Within the yellow circle above the clarifier knob are two more green/red indicator buttons. Pressing these will drag full VFO control in the main VFO-A dial to the Clarifier knob as VFO-B The main dial then behaves as a clarifier for VFO-B operation.
Pressing the illuminated buttons in the violet circle will restore VFO operations to the main tuning dial again.
5. SETTING REPEATER OFFSETS
This feature only has relevance on the 29MHz and 50MHz bands (10 metres & 6 metres). First rotate the main VFO dial to the output frequency of the repeater. Then press & hold the AM/FM button for 1 second. The repeater setup area is now engaged and successive presses of the AM/FM button will choose ‘+’, ‘–‘ or ‘S’ for positive offset, negative offset or Simplex operation. Press and hold the AM/FM button for one more second to save the setting and exit this mode. This will engage the default repeater offsets for each band, but if these offsets are not correct for your local repeater, they may need to be adjusted within the main Setup Menu as items 057 (10M) and 058 (6M).
(If a sub-audible tone (CTCSS) needs to be applied to the repeater as well, see the next section)
6. SETTING SUBAUDIBLE TONES (CTCSS) FOR REPEATER USE
To add a sub-audible tone to the transmitted signal, we use the same avenue as selecting the repeater offset, by pressing and holding the AM/FM button for 1 second. The display will show the present tone frequency and tone squelch mode of ‘TN’, ‘TS’ or ‘OFF’ . These three modes may now be selected by rotating the main VFO knob. TN represents tone selection on transmit only. TS engages the Tone Squelch receive feature of your radio and is not often used. OFF will deactivate CTCSS features. While this setup area is still active, rotating the smaller VFO-B knob will select one of the standard CTCSS tones as per your local repeater requirement. If in doubt, try 915 TN to select 91.5Hz as a typical tone access code while using a repeater
Press and hold the AM/FM button for one more second to save the setting and exit this mode.
7. SAVING & RECALLING MEMORY FREQUENCIES
The FT-950 as a few different ways of preserving frequencies, but be aware that each memory stores a lot of extra information, like repeater settings, spit operations, preferred antenna, attenuator & clarifier status and audio filter settings. Here we will focus on using the 99 regular memories.
SAVING TO A MEMORY
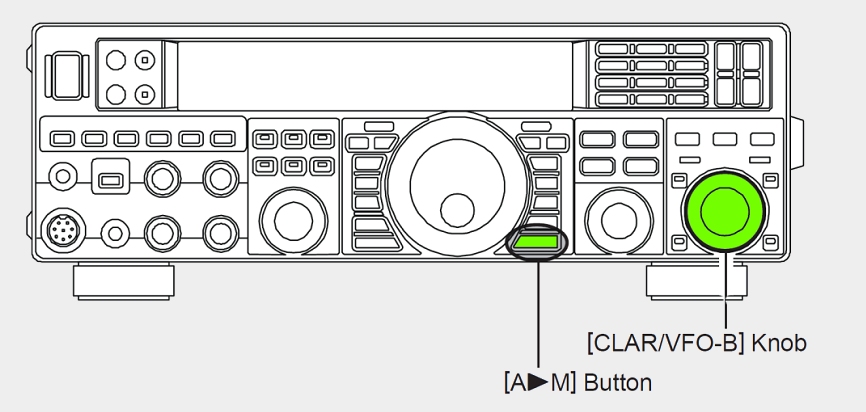
Using the main VFO knob, select your preferred operating frequency and mode. Then press the A>M button to the lower right of the main VFO knob.
This will bring up a viewing window of all 99 regular memories. Rotate the smaller VFO-B knob to select which memory position (1-99) will be the target location.
When ready to save, just press and hold the A>M button again for 2 seconds. Job done!
RECALLING A MEMORY
Immediately to the right of the main VFO knob is the V/M button. This selects between VFO frequencies and regular memory frequencies.
Sometimes it is difficult to tell which mode you are in, but if you look in the lower right-hand corner of the display, you will either see a clarifier position (VFO mode), or a 2-digit memory channel number (memory mode)
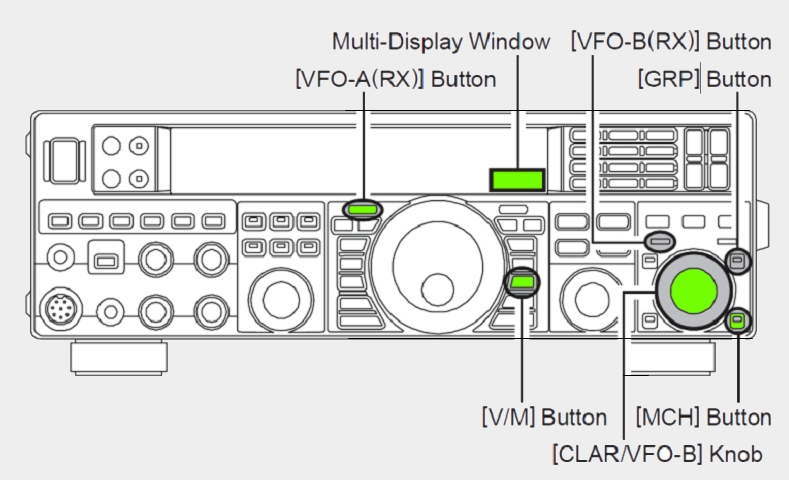
While in the Memory Mode, press the MCH button to the extreme lower-right corner of the rig until its orange lamp comes on. Now if you rotate the smaller VFO-B knob you can select the channel 1 to 99 that you want to use. Note that it will skip over any channel position number that has not yet had a memory frequency saved to it.
8. ADJUSTING POWER OUTPUT
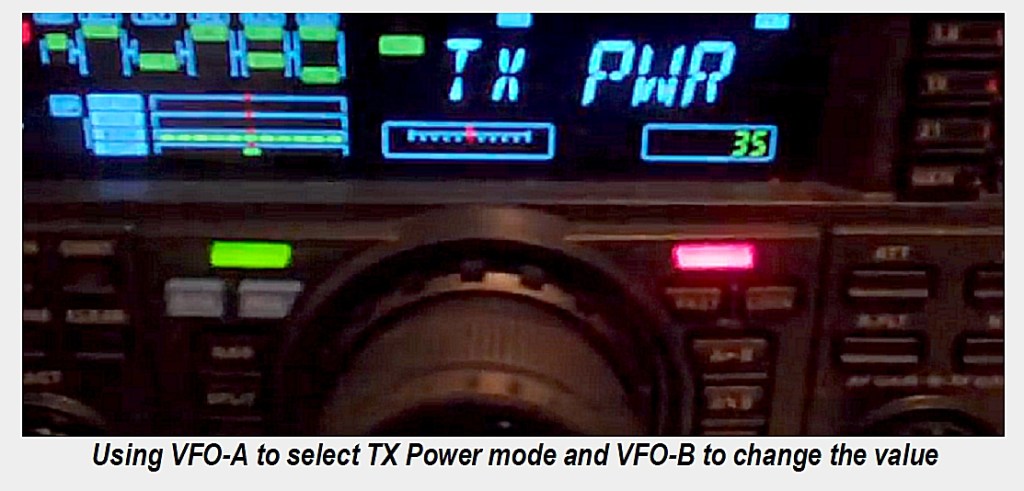
This is a pretty easy setting to change, but there is a trick at the end of it. Press the MENU button located to the lower-left of the main VFO Knob. A range of menu options are now available for adjustment. Rotate the main VFO-A knob until the text TX PWR appears on the display. In the lower right-hand corner of the display is a 2-digit number representing the present transmitter power setting. Rotating the smaller VFO-B knob will adjust this power value.
If you simply press the MENU button again it will return you to the VFO, but it does not save the setting. You have to Press and HOLD the MENU button for 2 seconds when leaving the Power Setting menu in order for the change to be preserved.
GOOD TIP FOR QUICKLY CHANGING POWER
There is a shortcut ‘Custom Switch’ that can be applied to any setting. As before, press the MENU button and rotate the dial until TX PWR is shown. Now Press and Hold the CS button (directly above the MENU button) for 2 seconds until a double-beep is heard. You have now programmed CS as a shortcut to take you directly to the power setting menu at any time.
You will still need to press & HOLD the MENU button to save any changes and exit this setting
9. SPECIAL COMMENTS
The FT950 sometimes gets upset during portable operation by having RF get into the supply power leads and generating a nasty feedback. Symptom is that you are on SSB and press the TX button. As soon as you speak into the microphone the TX Power meter shows a big transmit power deflection and stays there while the button is down. People at the far end just hear an awful noise.
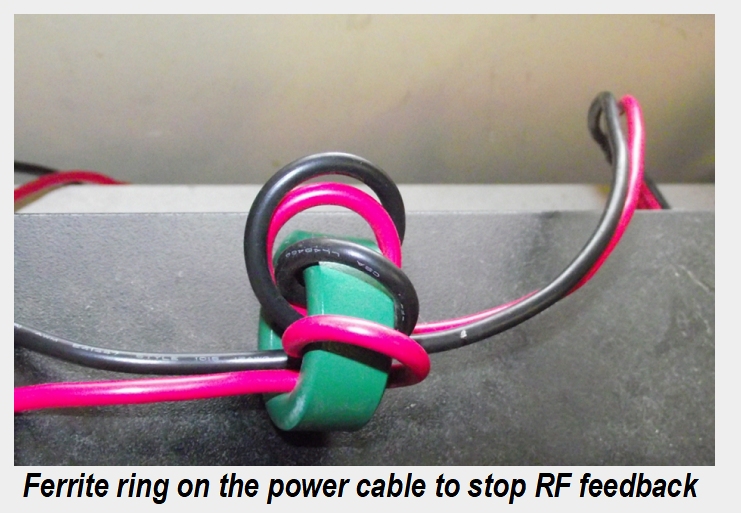
This situation can be improved just by moving the power leads and battery a bit further from the coax cable, but to really fix it, you need to wind the power cable through a couple of decent sized ferrite rings and leave them there permanently.
This is a good tip for other rigs as well, but the problem is particularly evident with the FT-950 under battery power.
Download this document as a PDF

