
P334
YAESU FT7900
VHF/UHF Transceiver – What you Need To Know
INTRODUCTION
The Yaesu FT7900 is a Dual Band VHF-UHF FM transceiver.
The radio is capable of 45 watts on 70cm and 50 watts on 2M. It has several memory arrangements for favourite frequencies. There are 1000 standard memory channels, five shortcut ‘Home’ channels, plus 50 sets of band-edge memories for specific range band-scans. Finally there are 20 additional memory banks that can be used to copy different standard memory configurations.
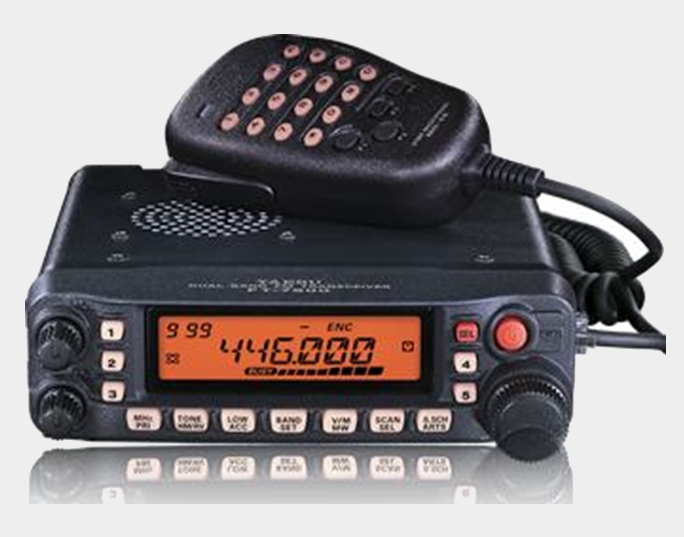
1. POWERING ON AND OFF
Press and hold the round red button on the front panel for 2 seconds. Press and hold again to turn the power off.
2. BAND SELECTION
On the centre of the button cluster is a button labelled BAND SET. Pressing this buttons steps the transceiver through the bands it is capable of receiving. 144MHz (2M), 250MHz, 350MHz, 433MHz (70cm), 850MHz. It is only capable of transmitting on the 2M and 70cm bands. Direct frequency may be made through the microphone keypad by entering 6 digits. The first three are deemed to be MHz and the remaining three presses set Khz.
3. MODULATION MODE SELECTION
Not required as this is an FM only transceiver.
4. SELECTING A VFO FREQUENCY
Provided the operator console is not locked, rotating the main VFO knob will increment or decrement the present frequency in fixed steps. Generally this will be 25KHz steps, but it can be changed via adjustment of Menu Setting 43.
5. SAVING & RECALLING STANDARD MEMORY FREQUENCIES
Brief presses of the V/M(MW) button will toggle the display between Standard stored memories and VFO operation. To save a memory to one of the 000 to 999 memory positions, follow these steps: Select VFO mode and set up the desired frequency, tone requirements (CTCSS etc), power setting, TX Offset (if req’d). When this is done, press the V/M(MW) button for 1-second. The screen will go mostly blank, except for a flashing memory location in the top left-hand corner. (it may show some previously saved frequencies) If you wait more than ten seconds, the radio will revert back to the VFO frequency Rotate the VFO knob to select the target memory (000 to 999). When the memory location has been selected, press the V/M(MW) again very briefly to preserve the VFO frequency to the selected memory location. The screen will say MEM-IN and revert back to the VFO frequency.
To select a previously saved memory, just briefly press the V/M(MW) button until the MEMORY option is selected and use the VFO knob to step between all memories.
6. USING HYPER MEMORIES
There are five single-button press memories called Hyper Memories into which the total current radio settings may be stored. On the front of the radio the buttons are labelled 1, 2,3 on the left and 4,5 to the right. These are really easy to use. Just dial up your preferred frequency, power, offset etc, then press and Hold the appropriate button 1-5 for 2 seconds. A long beep will sound and the present frequency etc. will then be saved to that number.
To retrieve a Hyper Memory, just briefly press button 1 to 5 as required.
7. SETTING REPEATER OFFSETS
There is an Automatic Repeater Shift (ARS) feature where the radio will try to apply a repeater offset when you tune the VFO to a part of the band where the radio thinks repeaters ought to be for your country. (This Auto Repeat feature can be enabled/disabled via Menu Setting 43 in the setup area.
Memory Location Must be done in the SET mode. Press & hold BAND SET button to enter this mode. A setting number appears in the top LH corner (1 to 48). For ‘Automatic’ repeater offsets based upon Aust band plans, select Setting 2, ARS. (the similar FT-7900 uses Setting 4 for this) Briefly press BAND SET, then ON or OFF can be chosen by turning the VFO knob. (ON=use automatic repeater offsets.) Short press of BAND SET to exit this area and another long press to return to normal operation.
Choosing a repeater offset manually is a similar operation, except rotate the VFO knob to Setting 33, RPT MOD Press BAND SET then rotate the VFO knob to choose +. – or OFF for forced simplex operation.
8. CHANGING DEFAULT REPEATER SHIFTS
Similar to setting repeater offset procedure, press and hold BAND SET to enter the SET mode,
then select Setting 39 Briefly press BAND SET and rotate the VFO knob to select the new offset. One short press of BAND SET saves the selection and a second longer press returns you to normal operation.
9. ENABLING SUB-AUDIBLE TONE OPERATION (CTCSS)
Similar to setting repeater offset procedure, press and hold BAND SET to enter the SET mode,
then select Setting 40 TONE M. Briefly press BAND SET and rotate the VFO knob to select the ENC option to activate this feature. One short press of BAND SET saves the selection and a second longer press returns you to normal operation.
10. SETTING SUBAUDIBLE TONE FREQUENCY (CTCSS)
Similar to setting repeater offset procedure, press and hold BAND SET to enter the SET mode, then select Setting 39 TN FRQ. (the similar FT-7900 uses Setting 44 for this) Briefly press BAND SET and rotate the VFO knob for the correct tone frequency for your repeater, if it uses one. (Most Australian repeaters are now using 91.5Hz) One short press of BAND SET saves the selection and a second longer press returns you to normal operation.
11. ADJUSTING POWER OUTPUT
Briefly press the appropriate “Low” button to step through the power settings for that side of the radio. 4 settings are available.
12. SPECIAL COMMENTS
- Squelch operation is separate for each side and is controlled by the outer ring of the volume controls.
- Hyper memories (6) are very handy being able to save whatever is happening on each side of the radio at that time. To recall a memory setting, briefly press the hyper memory button.
- Cross-Band repeater function is available.
- DATA connection for APRS or other digital modes is also standard on these radios.
- The microphone has 4 buttons that can be programmed for special functions such as “reverse” or main side change.
- Press and hold the “low” button to toggle the display between text and frequency for that memory channel on that side of the radio.
- Scanning of memories or bands or groups of memories is an available feature.
- Programming is simple via the front panel or via PC cable using inexpensive software. To enter program mode via the front panel, briefly press the centre “Set” button. Rotate the dial knob on the side of the radio being changed to select the setting required. Most settings are displayed in understandable text if the user has performed the operation previously. Press the dial knob, release then rotate it to change the options for the selection chosen. Once a setting has been changed, pressing the dial button will step back to the main programming menu then pressing the Set button will drop back to operating mode.
- Other great programmable features include mute for the other side when TXing and selection of either internal or extension speakers for each side of the radio.
- Remote head operation is by standard telephone line cord extension cable.
- There is a Time Out Timer – for operators looking to gain the “long over award”. This is useful if you accidentally sit on the microphone in the car and operate the PTT (it happens – believe me)
- The FT8900R has but one antenna connection in either “N” or “UHF” types. Mobile antennas are available in tri or quad band format that work very well. There are also duplexers available to allow you to connect a separate antenna for each band.
13. SUMMARY
The FT8900R has been around for quite some years now but is still very relevant and is an exceptional radio. It is quite easy to use and very reliable.
Download this document as a PDF

