P63
Using Antenna Tuners
The Antenna Tuning unit
An Antenna Tuning Unit (ATU) can be used to match the fixed impedance of your transceiver and transmission line to the variable impedance of your antenna.
The term ‘Antenna Tuning Unit’ is somewhat of a misnomer – what you’re really doing is matching the antenna’s feed impedance (which varies over a wide range depending on how near or far the antenna is from its resonant frequency) to the fixed impedance of your transmission line & radio
An ATU is useful when your antenna system is not resonant at the desired operating frequency and makes it possible to use a single antenna on more than one frequency (and often on two or more entire frequency bands).
An ATU does not make your antenna perform or radiate more efficiently. However, it does make your antenna system far more versatile because it allows you to operate across several frequency bands at somewhat reduced efficiency without having to change antenna.
In this case, we’re trading-in a bit of performance efficiency on just one frequency for versatility across many frequencies, which is a worthwhile trade-off for most Amateur stations.
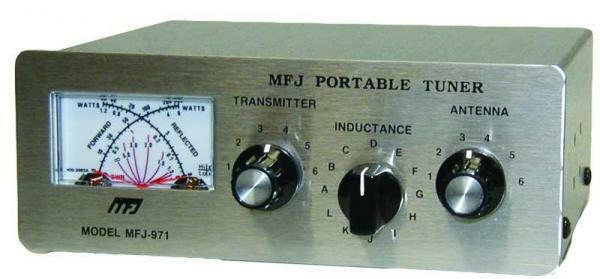
ATUs come in all shapes and sizes, including automatic models that use micro-processors and switches to find the best match for your antenna system.
Typically, a manual ATU will have two or three switches and knobs, depending on the design.
These adjustments add or subtract inductive and/or capacitive reactances inside the ATU allowing a suitable match to be found for most antenna systems.
It is worth noting that many transceivers will have a VSWR meter built-in and more recent models even include an internal ATU. However, in most cases, internal ATUs have a limited range and will not be able to cope with an VSWR much greater than 3:1.
How to Use an Antenna Tuning Unit
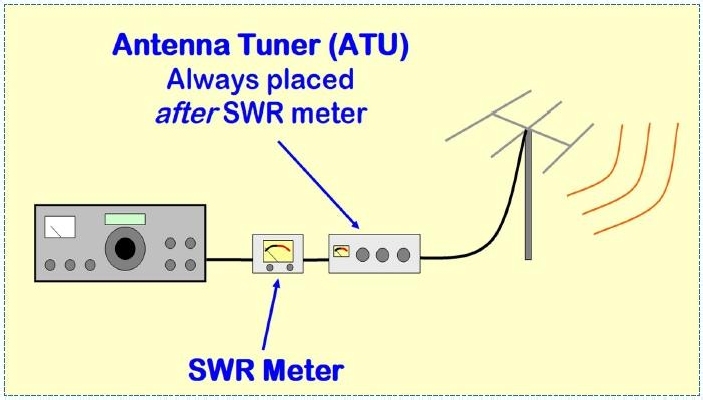
- Connect the ATU between the VSWR meter and the feedline to the antenna.
- Locate a clear frequency.
- Select the AM, FM or CW mode on your transceiver.
- Select low power (say no more than 10 W)
- Switch the VSWR meter to Cal (or on some meters it may be Fwd)
- Set ATU controls to mid-scale. Some ATUs will have a band selection knob, so set this to the appropriate band.
- On receive, adjust the ATU controls to peak receive noise. Repeat this procedure a number of times, noting that each control will interact with the others. Once you tune to peak receive noise you should be close to a suitable match.
- Announce your callsign and that you are testing.
- Transmit a CW, FM or AM signal and measure the SWR; use the procedures described earlier in this chapter.
- Whilst transmitting, carefully adjust the ATU controls for minimum SWR. Each control will interact with the other, so you may need to repeat this procedure a number of times.
- Repeat the previous step until you “find a match” with a SWR of 1.5:1 or less.
Note the settings for future reference when returning to this frequency.
It is good practice to keep the SWR meter in-line. In the case of an internal meter, ensure this is the default meter setting on your transceiver. This enables you to monitor your station’s performance and be aware of any potential problems.
The following video demonstrates how to use a typical Antenna Tuning Unit
The Foundation Level Study Guide
All Blue Tiles form part of the syllabus for the Foundation Level Recognition Certificate (operator licence). A primary source of information for many of the blue tile topics can be found within the Foundation Level Study Guide. This is a free download available at:
https://vkradioamateurs.org/flsg/ This is a digital book and contains many links to other resources and explanatory videos.
Information on Antenna Tuner Usage can be found from Page 43 in this book
ACMA Syllabus Extract
According to the ACMA Foundation Syllabus, the required knowledge on this topic is:
5.11 Antenna Matching
Recall the need to match an antenna to a transmission line and to minimise the Voltage Standing Wave Ratio (VSWR).
5.12 Antenna Tuning Unit
Recall the uses, purposes and adjustment of a typical manual ATU.
5.14 Voltage Standing Wave Ratio (VSWR)
Recall the correct placement, use and adjustment of an VSWR meter.
5.15 Acceptable VSWR
Recall that when testing a transmitter, a non-radiating load (dummy load) is commonly used to prevent a signal from being radiated.
